
The ground surface is a roof. It has peaks and valleys, it undulates. A building protrudes upward out of the ground (roof), much like a chimney protrudes upward from the roof. Flash the chimney to the roof. Flash the building to the ground, which acts like a roof. Building flashing, or a building apron.
Call this discipline building periodontics if you wish.
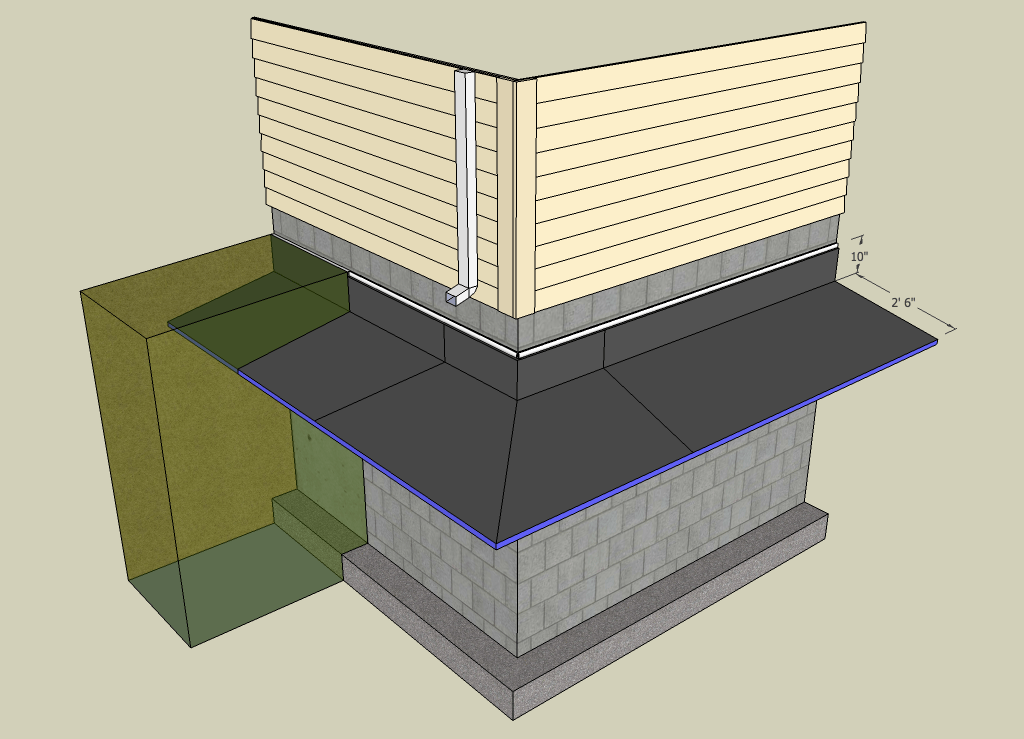
To install building flashing, call a roofer, and indicate that they may leave their ladders in the shop. You need EPDM membrane, seam seal and primer, termination bar, and insulation. I recommend using rigid insulation scraps (cutoffs) rather than virgin insulation materials. They may eventually be eroded by water or nested in by insects, so do the earth a favor and sequester your scrap in a useful location.
Here are the dimensions I use, which by all means merits modification. The excavation may be done by hand. I dig down 12” at the foundation, then outward 30” at a 20 degree slope away from the foundation. Soil conditions, windows, and plantings may call for other dimensions. If there are window wells for basement windows, then the apron may be installed beneath the basement window sill.
If the flashing is insulated at the foundation wall and beneath the slope, this configuration is practically as effective as insulation placed along the wall for a basement depth. The configuration is ideal for crawl spaces and slabs. With more insulation, dig the excavation deeper. Place the insulation. Connect the membrane with term bar about at grade and lay the pre-cut membrane in place. Seal seams. Cut and seal the inside and outside corners neatly. Backfill and landscape. Done.
A few additional matters
Sloped sites will always require additional care. If the landscape uphill from the house is not swaled so the surface water is diverted around the building, the apron described here will not be especially effective. Nor will it protect against rising groundwater.
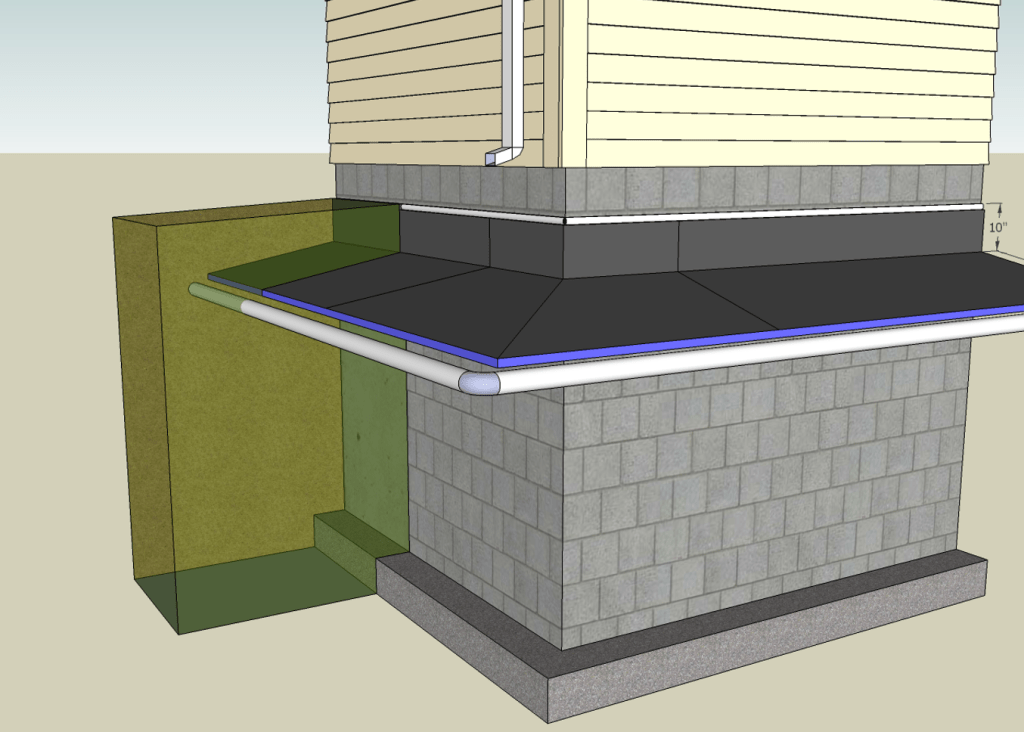
Which brings us to the downspouts. If they terminate in a single elbow right next to the foundation, then that was probably a wet corner historically, and the apron will help immensely. Having the water accumulate 30” away from the foundation with the apron is a good idea. But it’s a good idea to discharge the downspout water even further from the foundation. Bushes may help here because you can usually hide a downspout extender beneath the bushes.
The US EPA provides a very fine guidebook on moisture control: Moisture Control Guidance for Building Design, Construction and Maintenance. 2013. In Chapter 2 it describes how to get the rainwater away from the building. Here is a screenshot from page 33.

Don’t do what they show in that image; water will simply trap in pipe as shown, along with leaves and any other debris that lands in the gutters. And don’t attach a 10′ section of downspout on the ground–it will trip children, interfere with mowing, and will be removed for its inconvenience. Here’s what I suggest: decide where you want the water to wind up, in some low spot away from the building. Augur or post-hole dig a hole to a comfortable depth, say 6’. Get a cluster of perforated pipe to fill the hole. Cap all but two of the pipes a foot or two below the surface. Extend one of them up to grade, and install a pop-up drainage emitter. At the downspout take a splash block, and cut a hole, say, 4” in diameter, and fasten a round grate to the underside, leading to a fitting, say, 3”. Then run a horizontal sloped pipe from the splash block to the cluster of perforated pipes at a comfortable depth, say 2’. This configuration improves on the EPA idea in two ways: 1) leaves from the gutter are intercepted at the splash block, and 2) the pipe cluster serves as a drywell which drains water, preventing trapping.


For energy performance, this approach to waterproofing and insulation has a good pedigree. Here is a screenshot from the US Department of Energy Building Foundation Design Handbook, unfortunately out of print. The same insulation profile was promoted by US Department of Housing and Urban Development Frost Protected Shallow Foundation effort.

For extra protection, a perforated collector pipe may be run along the outboard edge of the apron, which should be discharged to daylight, or to the cluster drywell described above. This may work well for homes where the effort is to abandon the gutters. If that’s the plan, then solid material should be installed at the splash line, and the soil surface should slope strictly away from the foundation. If the roof has valleys, the quantity of water there needs special consideration.

Leave a comment